Replacing or upgrading a shower head is one of the easiest wins in DIY <a href="https://jfkmosque.com/home-depot-plumbing-fittings/”>plumbing, no soldering required, minimal tools needed, and you can finish before lunch. But shower head plumbing involves more than just unscrewing and screwing back in. Understanding how water flows through your system, what problems can develop, and how to troubleshoot them will save you frustration and wasted water. Whether you’re swapping out an old, corroded fixture or diagnosing weak water pressure, this guide walks you through the essentials so you can tackle shower head work with confidence.
Table of Contents
ToggleKey Takeaways
- Shower head plumbing replacements are straightforward DIY projects requiring only basic tools, Teflon tape, and 10–15 minutes, with no soldering needed.
- Low water pressure in your shower head often stems from a clogged flow restrictor or mineral-blocked aerator screen, both easily fixed with a white vinegar soak rather than requiring professional plumbing service.
- Proper thread wrapping with Teflon tape and careful hand-tight installation followed by a quarter-turn wrench tightening prevents leaks and avoids costly damage to shower head components.
- Understanding your shower system’s key components—the cartridge, pressure balance valve, flow restrictor, and aerator screen—enables faster diagnosis and lower repair costs when problems develop.
- Monthly flushing and quarterly vinegar soaks keep your shower head functioning optimally in hard water areas, extending fixture life and maintaining strong water flow.
- Temperature control issues like sudden cold or scalding water indicate a failing pressure balance cartridge that requires professional replacement, not DIY cleaning.
Understanding Shower Head Plumbing Basics
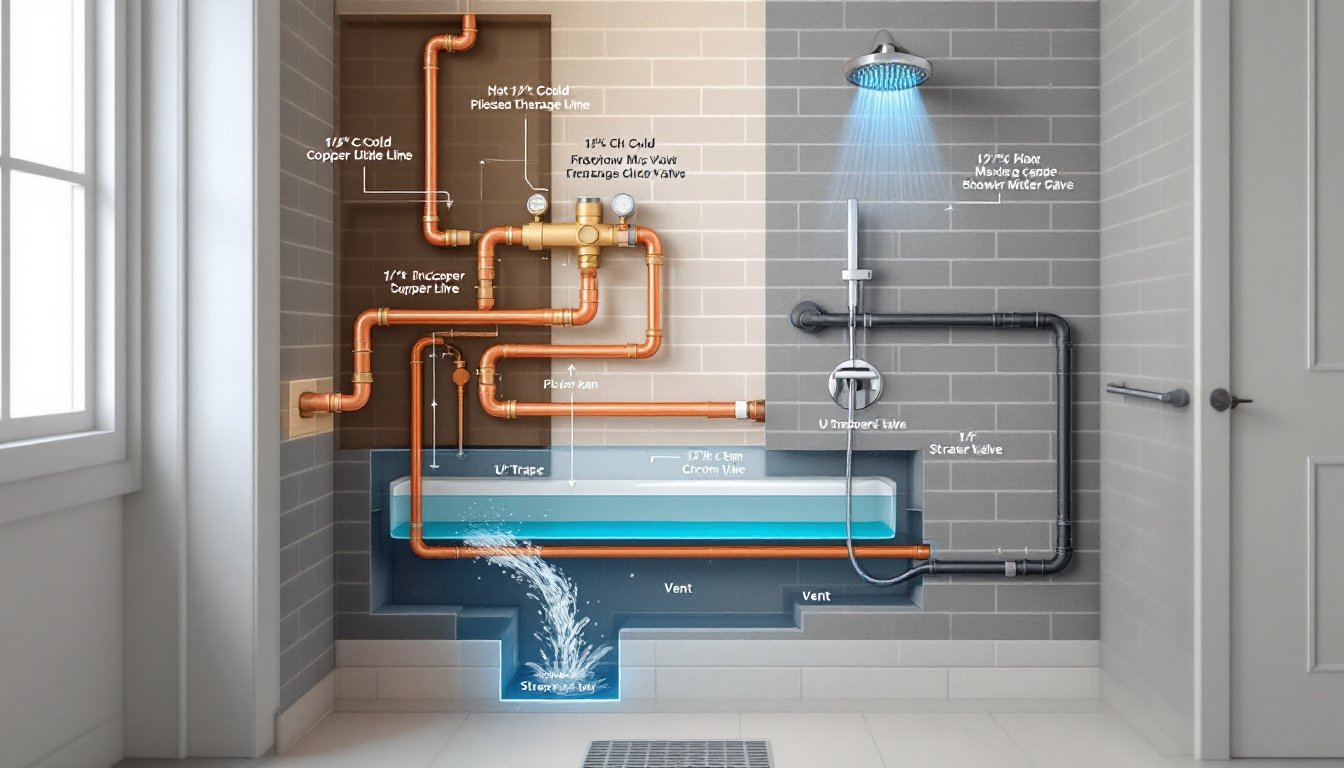
Before diving into installation, it helps to know how your shower system actually works. Water travels from your main supply line into the vertical pipe (called a drop ell or shower arm) that connects to your wall behind the tile or wall board. At the end of that arm sits the shower head itself, which contains a cartridge, pressure balance valve, or thermostatic valve depending on age and type, components that regulate water temperature and flow.
Components of a Shower Head System
Every shower head assembly has several key parts. The shower arm is the horizontal pipe extending from the wall, threaded on both ends to accept the fitting collar (called an escutcheon) and the shower head itself. Below the escutcheon is the cartridge or valve body, which mixes hot and cold water and controls flow rate.
Inside modern shower heads, you’ll find the spray plate (the part with holes), the flow restrictor (a small plastic or rubber piece that limits GPM, gallons per minute, to meet federal standards of 2.5 GPM maximum), and the aerator screen that catches mineral deposits and debris. Many older homes still have compression cartridges (separate hot and cold knobs), while newer builds typically use pressure-balance valves that prevent sudden hot or cold surges when other fixtures turn on.
Understanding these parts matters because low pressure often traces back to a clogged restrictor or mineral-blocked aerator, not the main line. When you know the system’s anatomy, diagnosis becomes faster and repair costs drop.
How to Install or Replace a Shower Head
Replacing a shower head is straightforward, but rushing prep work causes leaks and cross-threading. Follow these steps carefully.
Tools and Materials You’ll Need
Tools:
- Adjustable wrench or pipe wrench (to grip the shower arm so it doesn’t rotate when you unscrew the head)
- Teflon tape (also called plumber’s tape or PTFE tape: wraps threads to prevent leaks)
- Cloth or small towel (protects chrome or finished surfaces from wrench marks)
- Bucket (to catch drips, always expect water in the line)
- Small brush or old toothbrush (to clean threads before resealing)
Materials:
- One new shower head (check the connection size, most are 1/2-inch NPT, but verify before buying)
- Teflon tape
- Optional: plumber’s grease or anti-seize compound (prevents cartridge sticking on future removals)
Step-by-Step Installation Process
1. Turn off water supply. Locate your main shutoff valve or the shutoff for your bathroom if your home has isolation valves. Open a faucet downstream to release pressure, then turn off the shower.
2. Remove the old shower head. Use an adjustable wrench on the shower arm (not the head itself) while turning the head counterclockwise by hand. Wrap the cloth around the arm to avoid scratching. Expect water to drip, that’s normal. Once loose, unscrew by hand and let any remaining water drain into your bucket.
3. Clean the threads. Use the old toothbrush to wipe away mineral buildup, debris, and old tape from the threaded connection on the shower arm. Inspect for cracks or damage: a damaged arm requires professional replacement.
4. Wrap with Teflon tape. This is critical for a watertight seal. Start at the base of the threads and wrap the tape clockwise three to four times around the arm, stretching gently as you go. The tape should cover all threads without overlapping itself. Step-by-step installation tutorials show this technique clearly if you’re unfamiliar.
5. Install the new head. Screw it on by hand first, you should feel resistance after two or three full rotations due to the tape. Once hand-tight, use the wrench on the arm again (not the head) to turn another quarter turn clockwise. Don’t over-tighten. Over-tightening cracks the escutcheon or strips plastic cartridge housings.
6. Test for leaks. Turn water back on slowly. Watch the connection point where the head meets the arm for drips. A small weep (one drop per minute) often stops after a few minutes as the tape settles: significant streams mean you need to tighten slightly more or re-tape.
Most replacements take 10–15 minutes if the old head comes off easily. If you encounter a stuck head (common in older homes with mineral buildup), apply a penetrating oil like WD-40 and wait 30 minutes before attempting removal. Professional replacement services can handle seized fittings if DIY methods fail.
Common Shower Head Problems and Solutions
Three issues dominate shower head complaints: low flow, uneven spray patterns, and hot/cold mixing issues. Most are fixable without replacing the entire assembly.
Low Water Pressure and Clogs
Weak water pressure, especially when the rest of the house flows fine, usually means the flow restrictor or aerator screen is clogged with mineral deposits. This is the easiest fix you’ll encounter.
To clean: Unscrew the shower head by hand (no wrench needed). Look inside the head opening where you’ll see a small plastic piece, often with a washer-like shape. That’s the restrictor. Pop it out with a flathead screwdriver and soak it in white vinegar for 1–2 hours to dissolve minerals. Meanwhile, soak the entire head in vinegar as well. Use an old toothbrush and a soft cloth to scrub the spray plate holes gently, avoid sharp instruments that can damage the spray holes.
After soaking, rinse thoroughly under running water and reassemble. Pressure typically returns to normal. If not, the issue lies deeper in the cartridge or valve body. Comprehensive maintenance guides walk you through cartridge inspection if needed.
Another cause of low pressure: check if your home’s shutoff valve is partially closed. This is surprisingly common after plumbing work elsewhere. Open it fully (turn counterclockwise until it stops), then test the shower.
Uneven spray or missing holes usually means the aerator screen is also clogged. Same vinegar soak works here. For stubborn mineral deposits, soak overnight or use a solution of equal parts vinegar and water with a small amount of dish soap.
Temperature control issues, shower suddenly runs cold or scalds, indicate a failing pressure balance cartridge. This is a structural problem that requires cartridge replacement, not just cleaning. Most cartridges cost $20–$40 and snap out after removing the handle. But, if you’re unfamiliar with your valve type, call a licensed plumber. Mixing valve repairs vary widely by manufacturer, and mistakes can disable the entire system.
For routine maintenance, flush your shower head monthly by running it at full blast for 30 seconds to dislodge loose sediment. In hard water areas, vinegar soak every three months keeps mineral buildup minimal. These small habits extend your shower head’s life and keep flow strong without drama.