A kitchen island with sink and dishwasher transforms the heart of your home from a one-person workspace into a genuine hub for cooking, cleaning, and socializing. Rather than just extra counter space, a functional island with integrated sink and dishwasher becomes the workhorse of meal prep while freeing up your main sink for other tasks. Before you jump into installation, you need to understand the plumbing and electrical demands, layout constraints, and material choices that separate a successful build from a costly mistake. This guide walks you through the critical planning stages and hands-on steps to add a kitchen island with sink and dishwasher to your space.
Table of Contents
ToggleKey Takeaways
- A kitchen island with sink and dishwasher transforms your kitchen into a functional hub that reduces workflow bottlenecks and increases home resale value by signaling a well-designed layout.
- Proper plumbing rough-in is critical: water supply lines must run beneath the floor, drainage must slope 1/4 inch per foot toward the main stack vent, and improper venting causes backups that demand professional rework.
- Dishwashers require a dedicated 120-volt, 15-amp circuit and cannot share power with other appliances; run 12-gauge wire from your breaker panel and use GFCI protection according to local electrical codes.
- Island depth should be 39–42 inches to accommodate seating with proper overhang, while length depends on sink size (36 inches minimum for a prep sink) and dishwasher width (24 inches standard); maintain 42 inches of clearance between your island and walls for safe door operation.
- Choose moisture-resistant countertop materials like quartz, solid-surface, or sealed stone, and opt for a drop-in sink if you’re a DIY beginner, as undermount sinks require professional installation or advanced routing skills.
- Never skip the rough-in plumbing and electrical phase before cabinetry installation: bad utility routing dooms the entire project and leads to costly mistakes that could have been prevented with proper planning.
Why Add a Sink and Dishwasher to Your Kitchen Island
A kitchen island with sink and dishwasher serves multiple purposes beyond aesthetics. It reduces traffic jams during meal prep by letting two people work simultaneously, one at the island, one at the main counter. The integrated dishwasher means someone can load dishes while others continue cooking, eliminating the bottleneck at your wall-mounted unit.
From a resale perspective, kitchens featuring an island with sink and dishwasher command higher valuations because they signal a well-thought-out layout. Homebuyers recognize the convenience factor immediately. If you’re designing for seating, an island with sink and dishwasher and seating becomes a casual dining and socializing spot, perfect for family breakfasts or entertaining.
But, this upgrade demands planning. You’re running water supply, drainage, and dedicated electrical circuits to an island that sits away from perimeter walls, exactly where utilities weren’t designed to reach. Skipping this phase costs money in rework.
Essential Plumbing and Electrical Considerations
Water Supply and Drainage Lines
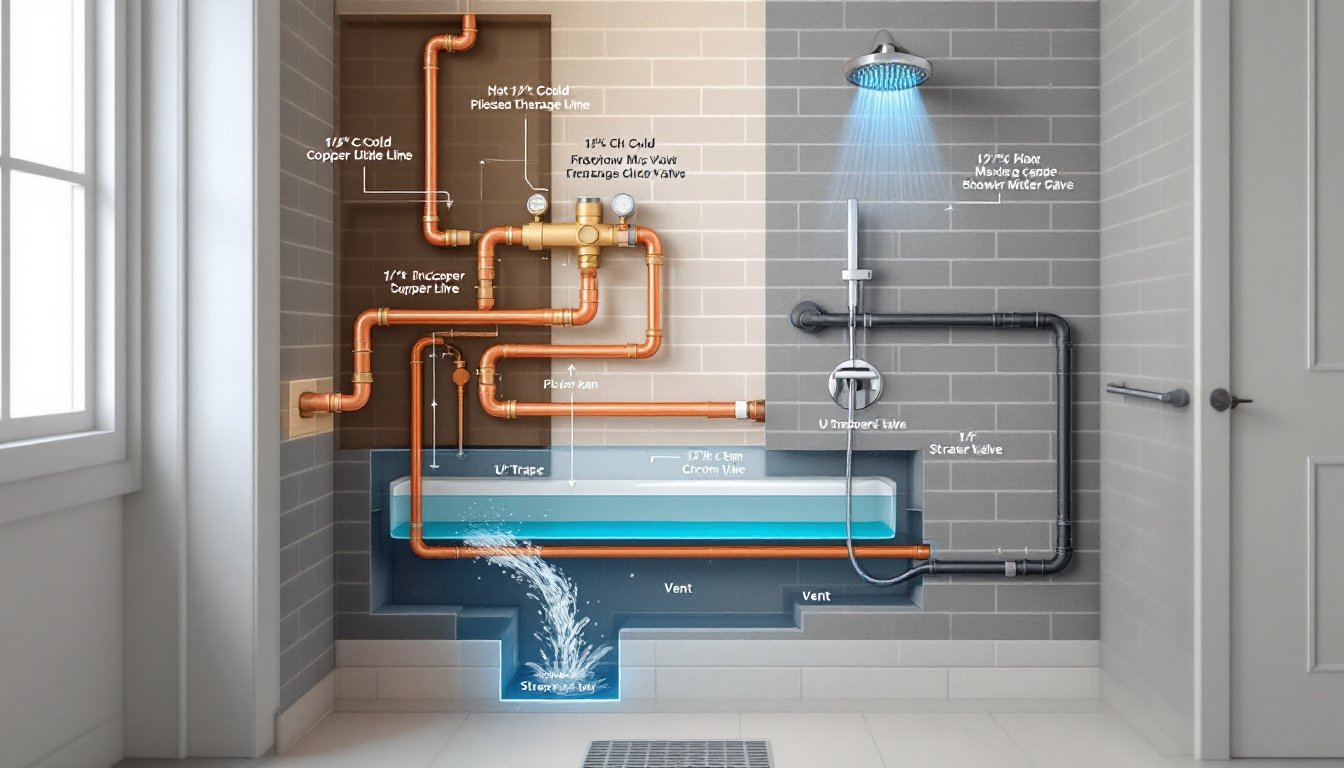
Before measuring cabinet dimensions, understand how water gets to and from your island. Supply lines (hot and cold) must run beneath the floor or through the subfloor from your main water source, typically under the kitchen. If your kitchen is on a second floor or if the main line is distant, budget for longer runs, every foot adds cost and complexity.
Drainage is the trickier part. Your sink drain must slope downward at roughly 1/4 inch per foot toward the main stack vent or a secondary vent. Horizontal runs should use 1.5-inch drain pipe for a sink: the dishwasher drain (typically 5/8-inch rubber hose) connects to the sink drain or a separate standpipe. You can’t simply drop a vertical drain through the island: it needs a trap underneath to prevent siphoning, and proper venting so air can escape.
Many homeowners hire a licensed plumber for island work, and for good reason, improper slope or venting causes backups. If you’re running supply and drain lines yourself, check local building codes: some jurisdictions require a licensed plumber to handle island rough-in. Shutoff valves for both hot and cold lines should sit within the island cabinetry for easy maintenance.
Electrical Requirements for Dishwashers
A standard kitchen dishwasher draws 15 amps and requires a dedicated 120-volt circuit. That’s a hard rule, the NEC (National Electrical Code) demands it. You cannot share a dishwasher circuit with other appliances or outlets. Run a 12-gauge wire from your breaker panel to the island location. If your main panel is far away or already at capacity, you may need a sub-panel, which pushes the job into professional territory.
The outlet or hardwired connection must be located inside the island cabinet, protected from water and grease splashes. Use a GFCI (ground-fault circuit interrupter) outlet if code permits it, or have the breaker itself be a GFCI device. Dishwashers are often hardwired directly to the breaker without an outlet box, so verify your unit’s requirements and local codes before purchasing.
Design Layout and Space Requirements
Island depth matters. A standard island is 24 inches deep, enough for one row of cabinetry facing the room. If you’re adding seating on one side (the classic kitchen island with sink and dishwasher and seating setup), you need at least 15 inches of overhang past the cabinet face, which brings your total depth to roughly 39–42 inches. Without that overhang, stools crowd into the plumbing and cabinetry.
Length depends on your layout and sink size. A 36-inch-wide prep sink fits comfortably within a 48-inch island section. A dishwasher occupies 24 inches of width (standard dimension). If you want both sink and dishwasher side by side, budget 60–72 inches minimum. Leave 42 inches of clearance between your island and walls or other appliances for door swings and foot traffic, this is an IRC guideline, not a suggestion.
Clearances around the island are equally important. Toe kicks on your island should be recessed 9–12 inches to prevent toe stubbing and allow someone to stand close while working. Consider how cabinet doors open on adjacent run, an island dishwasher door swinging toward your main sink creates collision points. Sketch your layout to scale before ordering materials: kitchen island ideas and design showcases help you visualize configurations and identify spatial conflicts.
Choosing the Right Fixtures and Materials
Your sink choices affect plumbing complexity. A drop-in (rim-mount) sink is easiest for a DIYer because it sits on the countertop edge and doesn’t require special cutouts or support underneath. An undermount sink requires a solid surface (quartz, granite, or butcher block) and a router or a pro installer to create the recess. Stainless steel is durable and hides water spots if you dry it immediately: composite sinks (granite, quartz) resist staining but cost more.
For the dishwasher, stick to standard 24-inch models, they’re the norm and fit into typical cabinetry. Slimline 18-inch units exist but have smaller capacity and limit your counter layout flexibility. Integrated or panel-ready models blend with your cabinet fronts, while stainless or black finishes stand out intentionally.
Countertop material sets the tone. Butcher block is warm and forgiving on dishware but demands sealing and careful cleanup near wet areas. Quartz resists stains and moisture, making it ideal near sinks. Granite requires annual sealing but exudes durability. Laminate is budget-friendly but vulnerable to water damage around sink edges. Island with sink and dishwasher projects almost always favor materials rated for wet environments, quartz, solid-surface, or sealed stone.
Cabinet construction matters. Face-frame cabinetry (traditional, with visible rails) is structurally straightforward. Frameless (European) cabinets maximize interior space but require precise installation. Ensure cabinetry is rated for dishwasher proximity: moisture tolerance varies.
Installation Steps and DIY Tips
Before you begin, understand your skill level. Plumbing and electrical for an island require patience and code knowledge. If you’re uncertain about venting or circuit calculations, hire those specialists and do the carpentry yourself.
Step 1: Finalize your rough-in. Plumbing and electrical must be installed before cabinetry arrives. Have a plumber route supply lines and set up the sink drain trap and vent. Have an electrician run the dishwasher circuit, GFCI protection, and any outlets you want inside cabinetry. This is not a shortcuts phase, bad rough-in dooms the entire project.
Step 2: Install cabinetry. Use a laser level to ensure your base cabinets are perfectly level front to back and side to side, this is critical for drawers and appliance fit. Anchor base cabinetry to the floor with lag bolts or construction adhesive, depending on your flooring type. Scribe the sides if the island sits against walls.
Step 3: Set the sink and dishwasher. Connect supply lines with compression fittings (easier than solder for amateurs) and dry-fit drain plumbing before tightening. Test for leaks with the sink turned on and doors closed, moisture inside cabinetry is your enemy.
Step 4: Install the countertop. If you’re using a drop-in sink, cut the hole according to the sink template, apply a bead of silicone sealant, and set the rim. An undermount sink requires professional installation or a templated approach with a router. Secure your countertop with construction adhesive or brackets underneath.
Step 5: Final connections and testing. Connect the dishwasher supply hose, drain hose to your sink trap, and electrical connection. Run a test cycle with no dishes, watching for leaks. Check cabinet interiors for moisture 24 hours later.
Pro tips: Acclimate lumber and cabinetry in your kitchen for 48 hours before installation so they adjust to humidity. Use shims between base cabinets and the floor, never force them level by moving cabinetry. Label all supply and drain connections before disconnecting them: photos are lifesavers. Wear goggles when cutting cabinet sides, dust and splinters fly. If your sink drains sluggishly after installation, venting is likely the culprit: call your plumber rather than using chemical drain cleaners, which can damage traps and supply lines. Kitchen island with dishwasher design resources and photo galleries demonstrate working installations and help troubleshoot layout questions.
Final Thoughts
Adding a sink and dishwasher to your kitchen island is one of the highest-impact renovations you can tackle. Done right, it transforms workflow and adds genuine function, not just appearance. Respect the plumbing and electrical demands, plan your layout carefully, and don’t rush the rough-in phase. A weekend spent measuring and sketching saves weeks of frustration and hundreds of dollars in rework.