A dead outlet, a flickering light receptacle, or those two-prong slots that no longer fit modern plugs, these are common signs that an electrical outlet needs replacing. The good news? Replacing an outlet is one of the most straightforward electrical projects a homeowner can tackle without calling an electrician. It takes about 15 minutes, requires only basic tools, and saves you a service call fee. That said, electricity demands respect. This guide walks you through the process safely and confidently, from shutting off power to securing your new outlet.
Table of Contents
ToggleKey Takeaways
- Replacing an electrical outlet is a straightforward 15-minute DIY project that saves service call fees when done safely and with proper tools.
- Always confirm power is completely off at the breaker and test the outlet with a voltage tester before touching any wires to prevent electrical shock.
- The basic replacement process involves disconnecting three wires (black/hot, white/neutral, and copper/ground) from the old outlet and reattaching them to the new outlet in the same order.
- Create small wire loops with needle-nose pliers and connect each wire to its corresponding screw (brass for hot, silver for neutral, green for ground) to ensure a secure connection.
- Test your newly replaced electrical outlet with a lamp or device after restoring power, and call a licensed electrician if the outlet doesn’t work or you encounter hardwired appliances or unknown wiring.
- Know when to call a professional: avoid replacing outlets tied to hardwired appliances like ovens or dishwashers, and stop if wires are damaged, frayed, or too short to reach new terminals.
Why You Might Need To Replace An Outlet
Outlets fail for several reasons. The most common is simple wear: repeated plugging and unplugging loosens the contacts inside, causing a loose connection that generates heat and stops holding devices securely. If your phone charger falls out or a lamp flickers when you move the plug, the outlet’s receptacle is worn out.
Damage also happens fast. Water exposure from a sink or bathroom spray corrodes the internal brass terminals, creating a fire hazard. A surge from a nearby lightning strike can burn out the outlet’s internal components. Outlets in high-use areas, kitchen counters, living room media walls, workshop benches, simply age faster.
Another reason to replace: upgrading to a GFCI (ground fault circuit interrupter) outlet. Bathrooms, kitchens, and outdoor locations require GFCI protection by code in most jurisdictions. A GFCI outlet trips instantly if it detects a ground fault (like moisture), protecting you from shock.
Finally, some folks replace outlets to add USB outlets or 20-amp outlets for higher-draw appliances. Whatever the reason, the installation steps are the same.
Safety Considerations Before You Start
Electricity doesn’t forgive mistakes. Before touching anything, you must turn off the circuit breaker serving that outlet. Flip the breaker to the OFF position, then test the outlet with a voltage tester or plug in a lamp to confirm power is truly gone. Don’t skip this step: it’s the difference between a safe project and a serious shock.
Wear safety glasses, when you strip wire, small pieces can flick toward your eyes. If you’re working in a damp area, wear nitrile gloves for grip and insulation. Never work on wet hands or standing on wet flooring.
If you’re unsure which breaker controls the outlet, turn off the main breaker. Yes, it’s overkill for a single outlet, but it’s the safest move if you’re uncertain. In older homes, unlabeled panels are common.
Finally, understand what’s off-limits: if the outlet is tied to a hardwired appliance like an oven, dishwasher, or AC unit, call a licensed electrician. Same applies if the outlet is in a wall with live wiring behind it that you can’t identify. When in doubt, hire a pro.
Tools And Materials You’ll Need
Tools:
• Voltage tester (non-contact or multimeter, about $10–$20)
• Screwdrivers (one Phillips, one flat-head)
• Wire strippers (if reusing existing wires)
• Needle-nose pliers (for bending wire loops)
• Flashlight (outlet boxes are dark)
Materials:
• Replacement outlet (standard 15-amp, 125V: costs $1–$5 for basic models)
• Wire nuts (if splicing, though ideally you won’t need them for a simple swap)
• Electrical tape (optional, but useful for securing loose wires)
For most replacements, you won’t need to buy wire nuts or tape. You’re simply removing an old outlet and installing a new one with the same wires attached. The wires are already the correct gauge and length: you’re just transferring them to the new outlet.
If wires are damaged, frayed, or too short to reach the new outlet’s terminals, you may need to extend them. That requires a junction box and wire nuts, which is a bigger job, again, call a professional if that’s the case.
How To Remove The Old Outlet
Step 1: Confirm power is off. Use your voltage tester on the outlet receptacle itself. Touch the tester’s probe to both the top and bottom slots, and the test should show no power. If it beeps or lights up, the breaker isn’t off, go back and find the right one.
Step 2: Remove the cover plate. Unscrew the single screw holding the faceplate and set it aside. If the screw is corroded, apply a bit of penetrating oil and wait a minute.
Step 3: Unscrew the outlet. Inside the box, you’ll see two screws on either side of the outlet. Turn them counterclockwise to loosen, don’t remove completely yet. Gently pull the outlet straight out so you can access the wire terminals on the back.
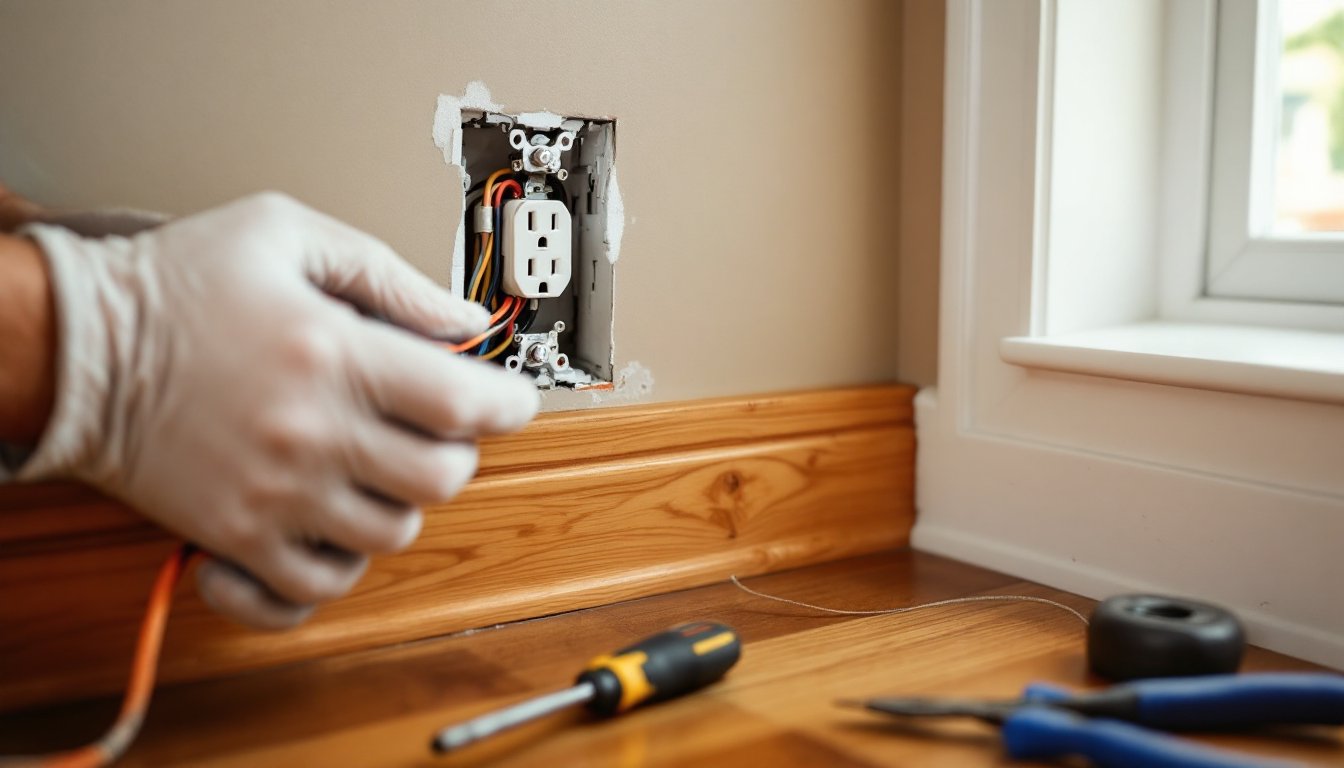
Step 4: Disconnect the wires. You’ll see three wires: a black (hot) wire, a white (neutral) wire, and a bare copper or green (ground) wire. The black wire connects to a brass screw: the white to a silver screw: the ground to a green screw. Use a screwdriver to loosen each screw and slide the wire out. Some folks photograph this step for reference, smart move if it’s your first time.
Step 5: Pull the outlet free. Once all wires are loose, slide the outlet completely out and set it aside. The box is now empty and ready for the new outlet.
Installing Your New Electrical Outlet
Step 1: Prepare the wires. If the wire ends are dirty or oxidized, strip off about ½ inch of insulation to expose fresh copper. Use wire strippers: a utility knife is slower and risks cutting too far. If the wires are already stripped and in good condition, you’re ready to connect.
Step 2: Create wire loops. Hold each wire about ½ inch from the end and bend it into a small hook using needle-nose pliers. This loop shape is crucial, it wraps around the terminal screw and holds securely when tightened.
Step 3: Connect the black (hot) wire. Slip the black wire loop under the brass screw on the right side of the outlet. Turn the screw clockwise to tighten. Pull the wire gently: it should not budge. If it does, tighten more. Repeat for the white (neutral) wire on the left silver screw, and the ground wire on the green screw.
Step 4: Tuck wires into the box. Gently push the outlet back into the electrical box. Fold the wires carefully so nothing pinches or kinks. They don’t need to look pretty, just safe and compact.
Step 5: Secure the outlet. Screw the outlet back into the box. Tighten both screws evenly so the outlet face is flush with the wall. Over-tightening can crack the outlet, snug is enough.
Testing And Finishing Touches
Step 1: Reinstall the cover plate. Align the faceplate holes with the outlet’s screw holes and screw it down. Tighten gently, overtightening can crack plastic faceplates.
Step 2: Turn the breaker back on. Go to the panel and flip the breaker to the ON position.
Step 3: Test the outlet. Plug a lamp, phone charger, or other device into the outlet. If it powers on, you’re done. If nothing happens, flip the breaker back off immediately and double-check your wire connections.
Step 4: Test with a voltage tester (optional, but smart). Even after powering the outlet, use your tester to confirm the outlet is live and the ground is functioning. This takes 30 seconds and gives you peace of mind.
If you installed a GFCI outlet, press the TEST button on the outlet face, power should cut immediately. Press RESET to restore it. This confirms the safety mechanism is working. Comprehensive tutorials on outlet installation can be found through resources like Family Handyman’s outlet replacement guide and Popular Mechanics’ detailed instructions.
If the outlet still doesn’t work, the problem may be upstream: a tripped GFCI on the circuit, a dead breaker, or cut wires in the wall. At this point, call a licensed electrician to diagnose. Don’t guess.
Conclusion
Replacing an electrical outlet is a legitimate DIY win. It’s fast, low-cost, and requires no special skills, just patience and respect for electrical safety. Turn off the breaker, confirm power is gone, disconnect the old wires, attach them to the new outlet, and test. You’ll save a service call and gain confidence for future projects.